 Save
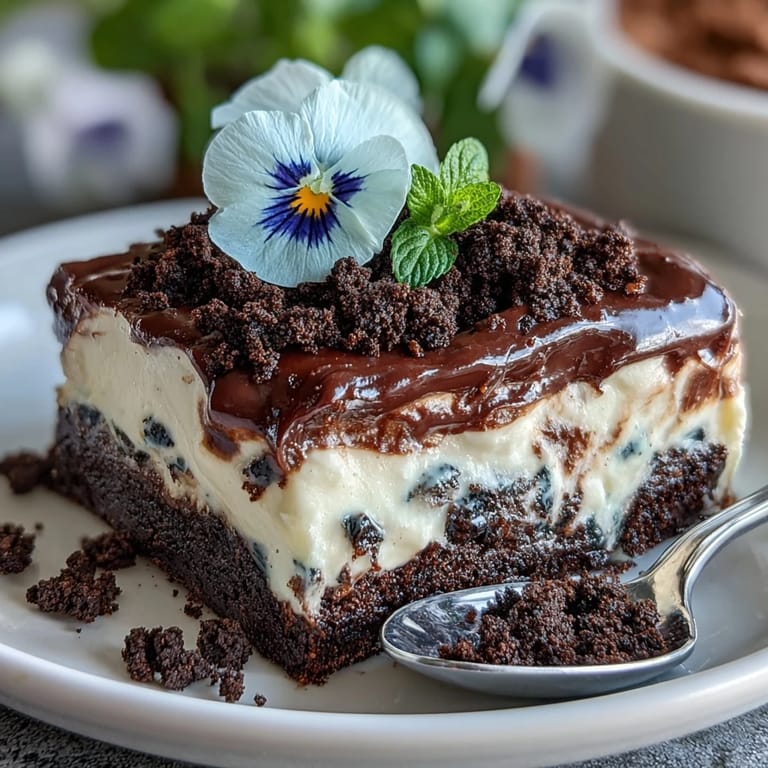
Save Last spring, the kitchen filled with the earthy aroma of brownies and the sound of vintage pop songs as I hunted for reasons to add a bit of cheer to our day. Sometimes a playful project is all it takes to lift the mood, and the idea of serving brownies in tiny flower pots—a little edible garden—sparked giggles even before we got baking. There was no big celebration planned, just a quiet Mother’s Day and a hunger for something beautiful and silly. The plan was simple: rich homemade brownies, a cloud of whipped cream, a thick layer of Oreo “soil,” and a handful of edible flowers to finish. By the time the pots were filled, the counter was dusted in “dirt” and happiness.
I still remember our younger cousin’s shriek of surprise when she realized the “soil” was chocolate cookies, and how the whole family started inventing garden stories for their pots. For a few minutes, the table sounded like a group of giggling landscapers debating the merits of pansies versus mint leaves. I even caught my mom carefully arranging her edible flowers like a real bouquet. Making these brownies quickly became more than a recipe—it was a chance for everyone to create a tiny edible world.
Ingredients
- Unsalted butter: Melting the butter gently brings a rich base to the brownies; I always let it cool just a minute so the eggs don’t scramble.
- Granulated sugar: Skip superfine sugar, regular works perfectly to keep the brownies chewy.
- Large eggs: Crack them in a separate bowl first, just in case you get a shell—you don’t want any crunch except the Oreos.
- All-purpose flour: Sift it with the cocoa for even mixing; lumps make brownies unpredictable.
- Unsweetened cocoa powder: Go for a deep, dark variety if you like an intense chocolate flavor.
- Baking powder: Just a touch, or your brownies will rise too much and be harder to layer in the pots.
- Salt: A small amount sharpens every other flavor; don’t leave it out.
- Vanilla extract: I always use a generous teaspoon for aroma, and sometimes sneak in a drop more.
- Oreo cookies: Crush with the cream included—the filling gives the “dirt” a perfectly sticky, crumbly texture.
- Heavy cream: Cold cream whips quickest, so chill your bowl and beaters if you can.
- Powdered sugar: Sweetens and stabilizes whipped cream so it holds its shape under the cookie “soil.”
- Edible flowers or gummies: Only use flowers labeled food-safe—violets and pansies are reliable and delicate.
- Fresh mint leaves (optional): A sprig or two looks like little plants sprouting in the pot and adds a fresh scent.
Tired of Takeout? 🥡
Get 10 meals you can make faster than delivery arrives. Seriously.
One email. No spam. Unsubscribe anytime.
Instructions
- Get Ready:
- Preheat your oven to 175°C (350°F). Prep your mini flower pots with a disc of parchment at the base, or line a baking tray if you’ll cut brownies to fit.
- Melt and Mix:
- Drop the butter into a saucepan over low heat; when it’s fully melted, slide the pan off and whisk in the sugar and vanilla until smooth and glossy.
- Add Eggs:
- Whisk in the eggs one at a time, watching the mixture turn thick and shiny.
- Combine Dry Ingredients:
- Sift flour, cocoa, baking powder, and salt over the wet mix, then fold gently—streaks of flour should disappear, but stop before it’s over-mixed.
- Bake the Brownies:
- Spoon the batter evenly into your pots (or spread it in a prepared pan), and slide them into the oven for 20–25 minutes, until a toothpick poked in comes out with damp crumbs clinging.
- Cool Off:
- Let brownies cool completely before you try to assemble—warm brownies will melt the toppings and lose their “soil” look.
- Make Oreo Dirt:
- Blitz the Oreos (cream and all) in a food processor or crush them in a bag with a rolling pin, making fine dark crumbs—the more uneven, the more realistic.
- Whip Up Cream:
- Beat the heavy cream with powdered sugar until you see firm peaks that hold when you pull the beaters away.
- Assemble the Pots:
- If you baked in a tray, cut brownies to fit each flower pot snugly at the bottom.
- Layer on Whipped Cream:
- Spoon or pipe a layer of whipped cream onto each brownie, making sure to cover edge-to-edge—this is the “soil’s” glue.
- Top with Oreo Dirt:
- Sprinkle Oreo crumbs thickly over the cream, letting some spill over the edge for a lived-in garden feel.
- Decorate and Chill:
- Press edible flowers, gummies, or mint sprigs on top, then refrigerate until you’re ready to show off your creations.
 Save
Save 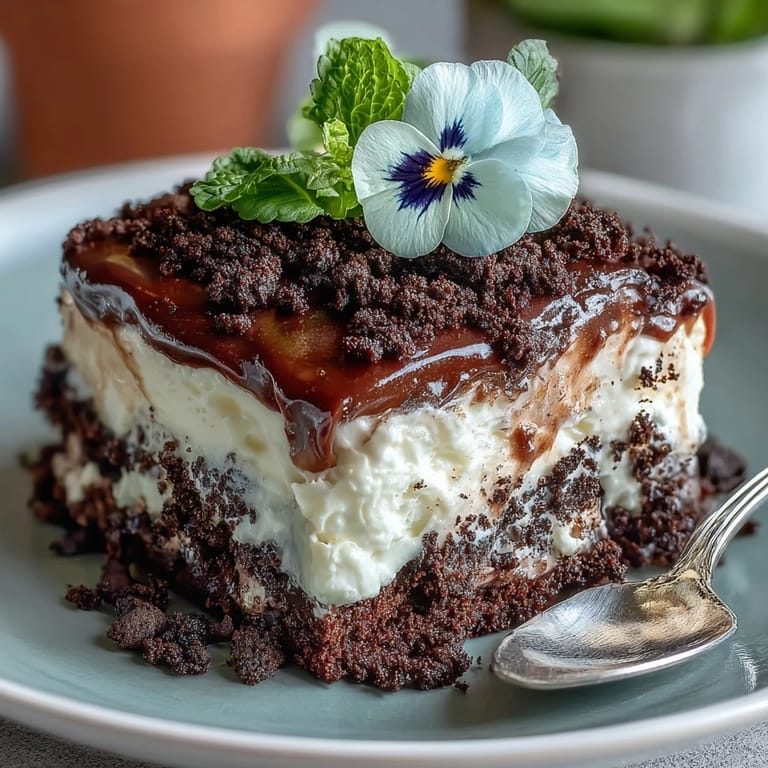 Save
Save The afternoon we first unveiled these at the table, my aunt’s laughter bubbled over the rim of her “flower pot,” and everyone exchanged bites to compare toppings. It’s the sort of treat that turns any pause in the day into a little celebration, and every empty pot felt like a badge of garden mischief earned.
Choosing and Using Edible Flowers
Not all flowers are safe for eating, so I learned quickly to research—or ask the vendor—when buying. The best edible flowers are freshly picked, not sprayed with chemicals, and gently rinsed before using. For a more playful batch, sometimes I swap in fruit gummies or candy flowers instead. If you opt for pansies or violets, keep them in the fridge until decorating so they stay perky and colorful.
Mini Flower Pots: Cleaning and Safety
Flower pots can leach a clay flavor if they’re brand new, so I always scrub them thoroughly with soap, rinse well, and then bake them empty in a hot oven to “cure” them first. Make sure you’re using food-safe, unglazed pots or stick to ramekins if you’re unsure. Tiny cracks can mean leaks of batter, so I double-check for chips before pouring anything in. And I like to add a little parchment at the bottom, just to be safe.
Extra Decoration Ideas for Your Brownie Pots
Sometimes I let everyone at the table choose their own edible toppers—fresh berries, colorful sprinkles, or even micro herbs. Swapping in different decorations keeps the dessert as creative as the company gathered around. When in doubt, extra Oreo “dirt” hides any cracks or lopsided cream.
- If you have leftover whipped cream, add a swirl on top of each finished pot.
- Dusting with cocoa powder gives the “soil” shadows and richness.
- Always serve these chilled so the layers stay sharp and the decorations last longer.
 Save
Save  Save
Save These flower pot brownies still make me smile long after the last crumbs are gone. They’re a sweet reminder that sometimes the best surprises are served in the most unexpected containers.
Recipe Q&A
- → How do I get fudgy brownies in mini pots?
Use the given flour-to-fat ratio and avoid overbaking: bake until a toothpick shows moist crumbs. Let brownies cool completely in the pots to set and retain a dense, fudgy texture.
- → Can I bake the batter in a pan instead of mini pots?
Yes. Bake in a lined pan, then cut rounds or squares to fit the pots. This is helpful if you don't have oven-safe mini flower pots.
- → What’s the easiest way to make the Oreo "dirt"?
Pulse whole Oreos in a food processor until very fine. Alternatively, place cookies in a resealable bag and crush with a rolling pin for coarse or fine crumbs as desired.
- → How far ahead can these be assembled?
Assemble up to a day ahead and keep chilled. Add delicate edible flowers just before serving to preserve their color and texture.
- → Are there good substitutions for heavy cream?
You can use chilled coconut cream whipped with powdered sugar for a dairy-free topping, though flavor and texture will differ slightly from whipped heavy cream.
- → How do I ensure edible flowers are safe to eat?
Buy flowers labeled food-safe from reputable suppliers or farmers' markets. Avoid flowers grown with pesticides not intended for culinary use.